Chicken coop ventilation 101: Ventilation made easy!
When I was trying to put together what to do for my very first chicken coop, ventilation was the hardest part to figure out.
How much did I really need? How could I ventilate without drafts? Where was I supposed to put the ventilation?
I couldn’t find any sources for ventilation that were straightforward, and, despite my best efforts, I made some mistakes ventilating that first coop.
And that’s why I put this guide together—to prevent you from making those same mistakes, and to save you the frustration of having to figure this all out yourself.
In this article, you’ll get all my best ventilation tips and info, including:
What chicken coop ventilation is
The types of ventilation you can use
Where to install ventilation on your coop
Ventilation for hot weather
Ventilation for cold weather (how to ventilate without drafts)
How to predator-proof your vents
How much ventilation your coop needs
This post contains affiliate links for my favorite products from Amazon, Etsy, and Rita Marie’s Chicken Coops. As an associate, I earn from qualifying purchases at no extra cost to you.
What is chicken coop ventilation?
Chicken coop ventilation is the airflow process that allows fresh air to be moved into your chicken coop and stale air to be moved out.
Stale air is air that includes gases from droppings and breath, as well as dust from bedding, chicken dander, feed, etc.
Ventilation can occur naturally through windows and other holes in your coop, or it can occur through mechanical means, such as by the use of fans and air exchangers.
The 11 reasons why your chicken coop needs ventilation
Ventilation serves the following purposes:
Brings in fresh air for healthy breathing
Removes moisture
Prevents roof rotting and shingle deterioration
Prevents coop condensation
Removes ammonia and other gases
Reduces the growth of dangerous molds, bacteria, and viruses
Reduces odor
Reduces dust
Prevents respiratory disease
Prevents overheating in warm weather
Reduces the risk of frostbite
All chicken coops need ventilation.
Chicken coops are naturally high in dust and moisture, and both of these components have a serious potential to cause disease.
Good ventilation in your chicken coop is the key to good chicken health.
A chicken coop with poor ventilation is a death trap.
Dust in your chicken coop can cause major problems.
“Dust in animal housing is a mixture of organic material including bacteria, bacterial and fungal toxins, fungal spores, urine, dung, pollen, and other feed and animal components.”
Numerous studies have documented the harmful effects of dust on animal health. The main concern for chickens is respiratory disease. The majority of dust in the chicken coop comes from dander (chickens have A LOT of feather dander), droppings, and bedding material.
And, unfortunately, all the popular bedding materials create dust that can cause serious illness in your birds, including the two materials I recommend above all others, sand and straw.
Below, you can see a chart summarizing the ill effects of dust from the three most popular bedding types. For more on this subject, see my article, The BEST chicken coop bedding: Sand vs. straw vs. pine shavings.
| Bedding Type | Effects of Dust | Sources |
|---|---|---|
| Pine Shavings | Liver and respiratory damage; cancer | Numerous – e.g., Ayars et al., 1989; Törrönen et al.,1989; Potgieter et al., 1995; Pelkonen and Hänninen, 1997; Demers et al., 1997 |
| Straw | Bacterial, mold, endotoxin illnesses | Olenchock et al., 1990; see the review in Wichert et al., 2008; Siegers et al., 2018 |
| Sand | Silicosis/silicate pneumoconiosis; cancer | Brambilla et al., 1979; Evans et al., 1988; Roperto et al., 2000; Lara, 2018 |
Good ventilation in your chicken coop will greatly help to reduce the level of dust in your coop and its associated risks.
Moisture in your chicken coop can cause major problems.
The other offender in chicken coops, high moisture levels, can also cause severe health problems in your birds. Moisture comes mainly from your chickens’ droppings and their breath.
Chicken droppings are incredibly high in moisture, ranging from 55-83% water. And chickens also have an incredibly high respiration rate, so they use oxygen in an enclosed area quickly and release large amounts of carbon dioxide. You need ventilation to move out this old air and bring in the new.
Microbes also flourish in chicken coops with high moisture levels. High-moisture coops not only contain significantly higher numbers of bacteria, but also a much greater diversity in organisms.
Basically, high-moisture coops have a much higher potential to spawn organisms that cause disease.
Ammonia is also a problem in coops with high moisture levels. Ammonia is a gas released during the bacterial breakdown of chicken droppings and bedding. If moisture is high, ammonia production can increase significantly.
Why is this so bad? Ammonia can cause all sorts of health problems for your chickens, including depressed growth, respiratory disease, and even blindness. And too much ammonia will actually kill your chickens.
In the table below, you can see some of the negative effects ammonia has on poultry. The studies shown here are summarized in Tasistro et al. (2007).
| Ammonia Exposure | Health Effects | Source |
|---|---|---|
| 25-50 ppm 12-24 hr/day for 4 weeks (brooding) | Reduced growth | Reece et al., 1981 |
| 20 ppm continuously for 6 weeks | Pulmonary edema, congestion, hemorrhages, respiratory tract damage, increased susceptibility to respiratory disease (Newcastle) | Anderson et al., 1964 |
| Increased from 25 to 50 ppm | Reduced growth, increased air sacculitis | Kleven and Glisson, 1997 |
| 10-40 ppm at prolonged exposure | Excessive mucus, matted celia, loss of celia in tracheal tissues, more E. Coli in lungs and air-sacs | Nagaraja et al., 1983 |
| 50 to 70 ppm | Keratoconjunctivitis | Kristensen and Wathes (2000) |
If you’ve ever smelled ammonia, you know it’s not a good way to go.
And that’s another thing, high-moisture coops stink! Microbial activity, ammonia, other gases—they stink!
Lastly, high moisture in your chicken coop leads to an increased risk of frostbite in the winter (an all-too-common problem in backyard chickens) and increased discomfort for your birds in the heat—you know that heavy, sticky feeling.
And, really, when it comes to the heat, your chickens need all the help they can get. High temperatures are really hard on chickens, and death from heat stress is much too common in backyard birds.
So, let’s get your coop ventilated!
Types of chicken coop ventilation
You’ve got the definition of ventilation down and you know why you need it, but what exactly does ventilation look like?
Ventilation comes in many forms. And that’s great for us because what works for one coop won’t work for another.
Rest assured, no matter what your coop looks like, there is a way to ventilate it.
Below is a list of the most common forms of chicken coop ventilation:
Other doors (including your human entrance door)
Open walls
Floating roofs
Open roofs
Wall-roof gaps
Holes cut in the walls or roof
We’ll talk about some of these vents in detail later in this article, but if you’d like to see full descriptions and photos of all of these vents and more, see my article, Chicken coop ventilation: 21 design ideas with pictures.
Where to install ventilation on your coop
You need to establish cross ventilation in your coop.
You need cross ventilation in your chicken coop. Basically, this just means you need fresh air to come in on one part of your coop, where it then interacts with gases and moisture, and finally travels out of another part of your coop, carrying the gases and moisture with it.
You can see what this looks like in the video below:
Cross ventilation can flow laterally in your coop—for example, into a south-facing window and out of a north-facing window. Or, it can flow vertically, from bottom to top—for example, into your coop’s pop hole and out of a higher-placed coop window.
Your hot-weather ventilation setup will need to be different than your cold-weather ventilation setup.
This is where a lot of people get confused. When you first start reading about coop ventilation, everything says you need tons of ventilation, but you also can’t have drafts. It doesn’t take long to realize this is nearly impossible to achieve.
Here’s the real deal: you need tons of ventilation in the hot months, when the more drafts you have, the better. But you need to reduce your ventilation in the cold months, because otherwise, you will have drafts, and your chickens won’t be able to stay warm.
Don’t misunderstand what I’m saying—you do still need some ventilation in the cold months to remove moisture and gases.
Basically, it comes down to this. In all weather, you want ventilation above your chickens’ heads—so near the top of the coop walls and/or in the roof itself. Whereas in warm weather, you also want to add ventilation anywhere you can—above chicken level, at chicken level, and/or below chicken level.
Let’s get into the details.
Mandatory ventilation for all coops: Ventilate above your chickens’ heads.
Every chicken coop needs some ventilation above the chickens’ heads. There are a couple of ways to do this:
Roof vents
Wall vents
Or use both!
Ways to ventilate a chicken coop roof
Roof/ceiling vents include:
Open ceilings
Floating roofs
Holes cut in the roof
Wall-roof gaps
We’ll talk about some of these vents in detail now, but if you’d like to see full descriptions and photos of all of these vents, see my article, Chicken coop ventilation: 21 design ideas with pictures.
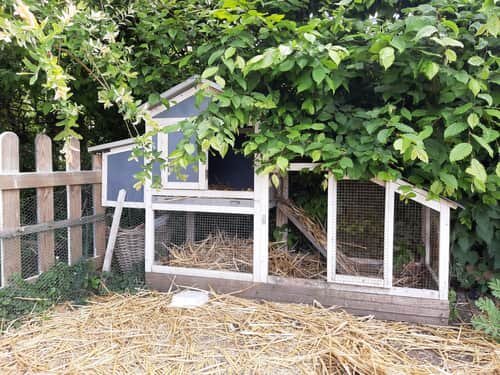
Open ceilings, floating roofs, and holes cut in the roof are excellent options for ventilating small coops.
You can see what an open ceiling looks like in the photo below—this coop was built by my friend, Wendy, from Eastern Idaho (Thanks for the photos, Wendy!).
The ceiling is simply made of a wood frame covered in hardware cloth.
In the photos below, you can see Wendy has partially covered the ceiling with some rubber pads for the time being (to help keep it a bit warmer in the cooler weather)—and she’s placed the coop underneath a protective run.

If you do decide to ventilate your coop with an open ceiling or holes, you’ll need to make sure you do keep your coop under a covered run—both to prevent drafts, and to prevent rain and snow falling in.
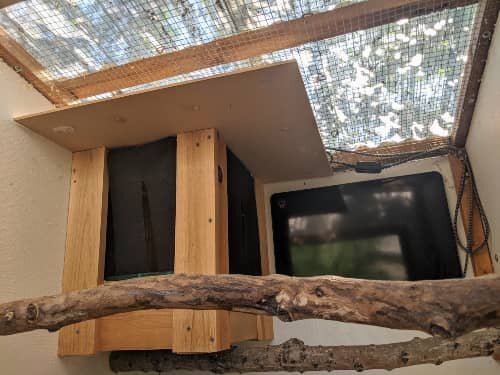
Floating roofs, on the other hand, don’t need to be built under a covered run. These are roofs that are built on top of a framework of boards and, therefore, “float” above the coop. Floating roof ceilings are also covered with hardware cloth to keep out wild birds and predators.
You can see what floating roofs look like in the photos below—these coops were also built by Wendy!


And in the photo below, you can see that Wendy’s covered part of the hardware cloth ceiling with an insulative material to help keep the coop a bit warmer. She just slides it onto the hardware cloth underneath the floating roof. And in the summer, she leaves it totally open.

If you like this floating-roof coop, you can find the exact plans Wendy used at The Garden Coop. You can also find plans there for larger coops and even for runs!
Soffit and ridge ventilation are excellent options for any size of chicken coop.
And then there’s the ridge and soffit venting system—this one is my favorite! Ridge vents are installed at the peak of a sloped roof (the ridge), and soffit vents are installed underneath the roof’s eaves. Air comes into the coop from the roof’s eaves (soffit vents) and leaves through the roof ridge vent.
It’s genius because drafts are basically absent with this type of vent system, and it’s one of the few systems that truly removes all the stale air. Why? Because air rises to the highest part of your coop. And if your roof is in two pieces that come together to form a peak (most roofs are), and you don’t have a ridge vent, some stale air will get trapped in the peak.
You can see how a ridge and soffit vent system work together in the video below:
One word of warning with a ridge and soffit vent system—don’t use gable vents with these. As energy conservation and ventilation specialist, Mike Keogh, says here, “…should you add a ridge vent to a roof with gable vents? No way—that’s a prescription for disaster.”
Here’s why:
“Gable vents will alter the air flow around the ridge vent and, especially when wind is parallel to the ridge (at right angles to the gable), can actually reverse air flow through the ridge vent, pulling rain or snow into the attic.”
So, there you have it. Roof ridge and soffit vents are incredible, but not to be combined with gable vents.
Ways to ventilate chicken coop walls (above chickens’ heads)
Wall vents include:
Wall-roof gaps
Windows
Holes cut in the walls
The wall-roof gap vent is an easy and effective ventilation strategy.
Check out the photos below to see the wall-roof gap in one of my coops. Although you can’t see it in the photos, the opposite wall of the coop also has this gap.
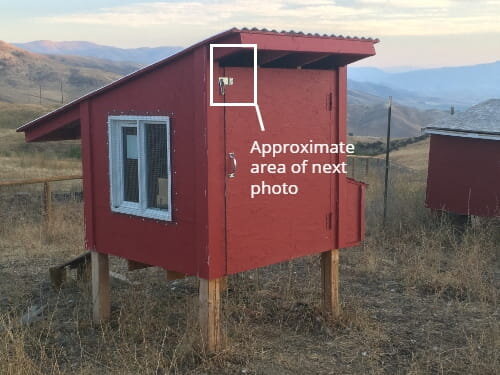

I love the wall-roof gap vent for coops that have this type of roof—one piece slanted in one direction (rather than two pieces coming together at the peak).
Fresh air comes into the coop from the wall-roof gap under the lowest side of the roof (still well above your chickens’ heads) and exits along the wall-roof gap on the highest side of the roof. There’s no place for stale air to get trapped because the highest point in the coop is vented—genius!
What’s the easiest way to add ventilation? The hole saw method.
Holes cut in the walls for vents may be any shape or size. In the photo of one of my coops below, you can see simple circular holes in the coop wall. This is one of the easiest holes to cut—all you need is a basic hole saw.

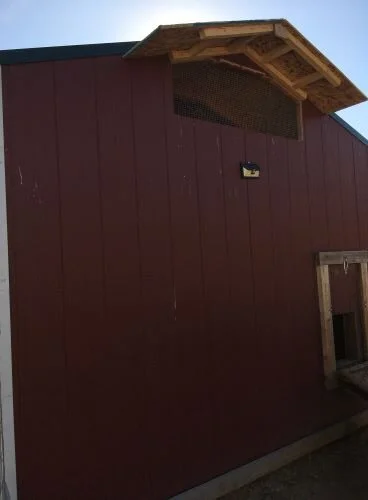
Gable vents are commonly used for ventilation above chicken head level.
Gable vents are a very common type of wall vent. These are located in the gable area of your coop, which is the section where the roof comes to its peak—you can see a photo of one of my coops with gable vents below.

How to prevent rain and snow from entering your vents.
One problem new chicken keepers fail to anticipate is the precipitation that gets into their chicken coops through their vents.
The easiest way to prevent this is to build (or buy) your chicken coop with a roof overhang. You can see an example of this in the photo below.

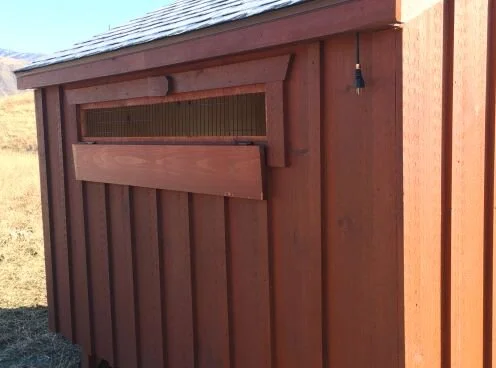
Alternatively, you can build a flap that hinges above the vent. This way, when the flap is propped open, it protects the vent from precipitation—it also allows you to cover the vents during blizzards or other storms.
You can see a flap like this in the photo of my coop above that shows a gable vent. In hindsight, we wish we would have built the flap broader on the top side. When the wind blows really hard, the coop does get drafty and we have to close the vent.
You also can build a sliding panel to close your vents, if necessary. You can see an example of this in the photo below.

You can also build a simple plywood overhang above your vent. You can see what that looks like on one of my coops in the photo below. This vent is downwind, and so this simple overhang is enough to keep the coop dry inside.
And lastly, if you install pre-made vents with slats, this can also help. You angle the slats down so weather doesn’t drip or blow in.
Ventilation for hot weather: How to ventilate the coop to keep it fresh and cool.
If you live in a hot climate or you have hot weather in the summer months—ventilate, ventilate, ventilate!
Lots of ventilation will create lots of air flow, which greatly reduces the temperature in the coop.
So, in addition to installing ventilation above your chickens’ heads (see the previous section), you’ll want to add some other ventilation too.
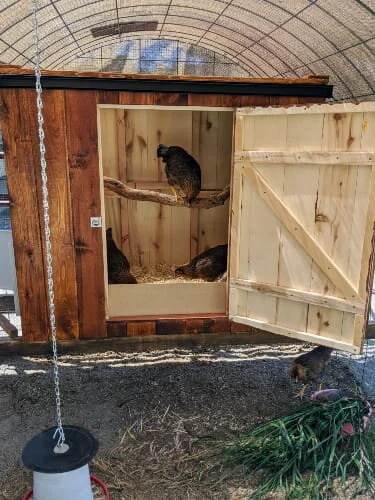
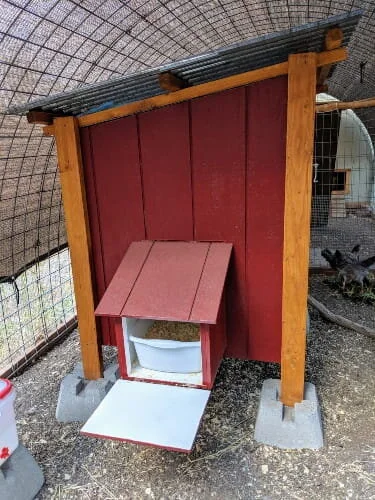
Open-walled ventilation is best for ultra-hot climates.
In fact, if you live in a place that’s hot nearly all year round (American south, I’m looking at you), you’ll likely want to consider open-walled coops. These are coops where at least one wall or part of a wall is made from hardware cloth.
You can see a couple of examples of open-walled coops below:

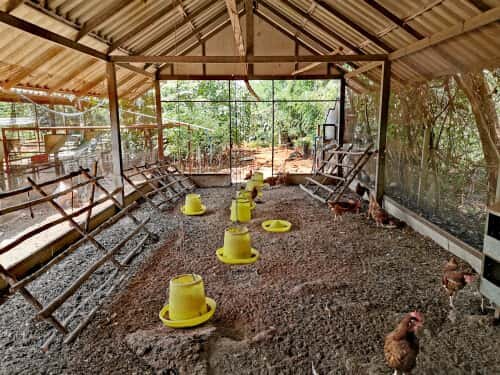
If you have a short period of cooler weather or inclement weather, you can then cover the wire wall(s) with plywood during that time to protect your chickens. Or, you could even just wrap the walls with a heavy-duty tarp. Of course, you’ll need to leave some space open at the top of the walls or roof for ventilation.
Adjustable windows and wall vents are ideal for places with both hot and cold weather.
On the other hand, if you live in a place that gets both hot weather and also winter weather, open-walled coops won’t be warm enough in the winter. You’ll instead want to design your coop with windows or wall vents. You can open the windows in the summer for increased ventilation, and then close them in the winter to prevent drafts.
You can also do this with vents (holes) cut in your walls. Leave them open in the summer, and shut them down in the winter. You can see what this looks like in one of my chicken coops in the photo below. This is my luxury coop—you can purchase your own here if you’re interested.
Screen doors are great for summertime ventilation.
You may also want to consider adding a screen door to your human-sized coop door. That way, you can leave the human door open during the hot months, and close it during the cold months. You may even consider just purchasing a low-cost magnetic screen door to hang during the summer months only.
However, if you’re worried about predators getting into your coop, regular screen doors and magnetic screen doors are too easy to tear through. You’d need to make your “screen” door out of hardware cloth instead, and ensure your door is well-latched.
Pop holes: the ventilation everyone forgets about.
Additionally, if you have a secure run that no predators are able to get into at night, you could leave your pop hole door open during the night for increased airflow. And if you live in a year-round hot climate, you may also want your pop door to be on the larger side
Floor ventilation may work in rare cases but can cause injury to chickens’ feet.
Lastly, some coops are built off the ground and with wire floors. I’m personally not a fan of coops with wire floors because these can cause injury to chickens’ feet—see more about this topic in my article, 8 chicken coop floor options: The best flooring materials for your coop.
However, if you use hardware cloth with the smallest spacing you can find for your floor, and your chickens only use the coop to roost in at night, this may also be an option for you during the hot weather. You can see an example of someone installing this type of floor below:
And in this next video, you can see an example of a coop where the floor has been mostly removed.
Note, that the coop in the video above is located in a secure run where predators can’t get in. Don’t even consider building a coop with no floor if you can’t protect your birds from predators.
My one other concern with this floor is that sometimes hens fall off roosting bars when they’re getting settled for the night. Hens have notoriously bad night vision, so I’d worry they may have a hard time getting back up into the coop and onto the roost.
I also only advise a coop with a wire floor in a secure, covered run. Even if predators can’t get into the coop from the hardware cloth floor, they may still try to get in, which can be very traumatic for your chickens.
And I just want to say one more time, I don’t personally recommend wire floors or missing floors for coops—I don’t believe these are in the best interest of chickens in most cases.
Never underestimate the power of a fan… or two… or three…
Fans are amazing for chicken coops during the summer heat—they really increase airflow when your natural ventilation just isn’t cutting it.
I do use fans in my coops during the summer, as you can see in the photo below. This was the first time I put the fan in, and my Ameraucana, Hooter, immediately roosted right in front of it for the night. The other chickens were wary of it at first, but not Hooter.
Sorry that this photo is super grainy, but I took it at night with my cell phone—still thought it was worth sharing Hooter’s enthusiasm for the fan!
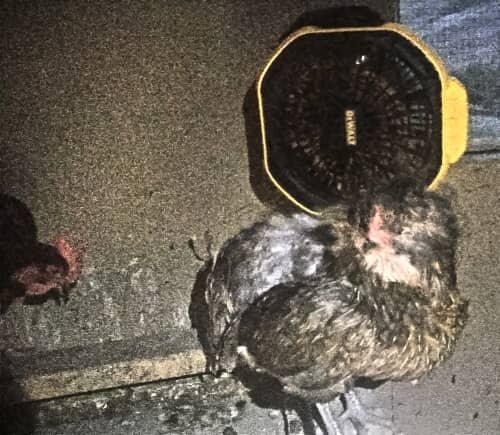
The fan above is the DeWalt cordless fan, and it’s amazing! The fan can be run on a cord or on a battery (with a rechargeable battery), and it’s built for dusty construction job sites—perfect for the coop!
You will need a charger and extra battery as well though for this particular fan if you don’t have electricity in your coop. My husband uses DeWalt tools, so we already had a charger and extra batteries on hand, but if you don’t use DeWalt tools, this type of fan may be pricier than what you want.
So, here are some other options you may want to consider:
Exhaust fans made for sheds, shops, or barns
Solar-powered fans for gable vents, ridge vents, or small coops.
Box fans - they won’t last more than a year or so, but they’re cheap to replace
If you buy a fan that’s not well-enclosed in some kind of wire or plastic casing, be sure to cover the exposed side with hardware cloth, so your chickens can’t fly into the blades and get injured.
Ventilation for cold weather: How to ventilate without drafts.
Draft-free ventilation for cold weather is easy. You just need to make sure you have ventilation above the chickens’ heads—you already learned how to do this in the section above, Mandatory ventilation for all coops: Ventilate above your chickens’ heads.
Then, you just need to close or cover any ventilation that’s at or below chicken level. So, for example, close your windows, and, if you still feel cold air coming off of your windows, hang heavy curtains over them.
If your vents are missing easy-to-close flaps or sliders, cover them with plywood—bolt it on and make sure no drafts are seeping around the edges.
You’ll also want to make sure your coop doesn’t have any gaps or seams where cool drafts can slip through. If you find any, cover them with wood, or caulk open or cracked seams, where necessary.
And if your pop hole door is letting too much cold air into the coop or causing a draft, hang curtains over it. You can use premade plastic curtains, or any heavy material you have lying around. My friend, Wendy, from Eastern Idaho, takes this approach—you can see how she’s hung curtains on one of her coop’s pop doors in the photo below:
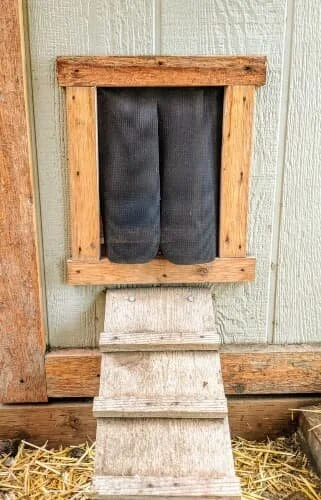
If your chickens are new to curtains, however, you’ll need to train them to use them. Start with the curtains tied open. When they get used to that after a couple of days, untie one side. Then, when they’re used to going through with one side down, you can untie the other side.
See how easy winter ventilation is? You just need to make sure all the ventilation in your chickens’ coop is well above their heads, and seal up any vents that aren’t.
How to predator-proof your vents
Cover all your ventilation holes and window or door screens with ¼-inch hardware cloth and secure the cloth with screws and washers.
Everything in the world loves the taste of chicken, so it’s essential you make sure no animal can tear its way into ventilation holes, or reach through wire or holes to grab your chickens (yes, there are animals that do this—raccoons, anyone?).
I advise you take this step even if you live in an urban area. Loose dogs, raccoons, skunks, snakes, owls, and sometimes even cats may get into your chicken coop and kill your birds if given a chance.
And if you live in the country, well, the predator list is endless.
One last thing, hardware cloth will also help to keep wild birds out of your coop. Wild birds may spread disease to your flock, and they’re notorious for spreading mites and lice. You definitely want to keep them away from your chickens as best as you can.
And, finally, how much ventilation does your chicken coop need?
Ah, the million-dollar question!
The short answer? Not very much in the cold months (3-4 square feet per coop usually suffices, including the pop door) and as much as you are able to manage in the hot months.
Want a more detailed answer? Check out my article, Coop ventilation: Here’s exactly how much your chickens need.
You may also be interested in:
The BEST luxury coop you’ll ever buy: Spoil your chickens with Rita Marie's
Chicken coop pop doors: Size, height off the ground, and design ideas
Pin this article for later!
Sources
Anderson, D., Beards, C., and Hanson, R., “The adverse effects of ammonia on chickens including resistance to infection with Newcastle disease virus.” Avian Diseases, v. 8, no. 3, 1964, p. 369–379.
Ayars, G., Altman, L., Frazier, C., and Chi, E., “The toxicity of constituents of cedar and pine woods to pulmonary epithelium.” Journal of Allergy and Clinical Immunology, v. 83, no. 3, 1989, p. 610-618.
Aziz, T. and Barnes, J., “Harmful effects of ammonia on birds.” Poultry World, 25 October 2010
Brambilla, C., Abraham, J., Brambilla, E., Benirschke, K., and Bloor, C., “Comparative Pathology of Silicate Pneumoconiosis.” The American Journal of Pathology, v. 96, no. 1, 1979, p. 149-169.
Damerow, Gail. Storey’s Guide to Raising Chickens. North Adams: Storey Publishing, 2017.
Demers, P., Teschke, K., and Kennedy, S., “What to Do About Softwood? A Review of Respiratory Effects and Recommendations Regarding Exposure Limits.” American Journal of Industrial Medicine, v. 31, no. 4, 1997, p. 385-398.
Dunlop, M., Blackall, P., and Stuetz, R., “Water addition, evaporation, and water holding capacity of poultry litter.” Science of the Total Environment, v. 538, 2015, p. 979-985.
Dunlop, M., Blackall, P., and Stuetz, R., “Odour emissions from poultry litter—A review litter properties, odour formation and odorant emissions from porous materials.” Journal of Environmental Management, v. 177, 2016, p. 306-319.
Dumas, M., Polson, W., Ritter, D., Ravel, J., Gelb, J., Morgan, R. and Wommack, E., “Impacts of Poultry House Environment on Poultry Litter Bacterial Community Composition.” PLoS ONE, v. 6, no. 9, 2011, p. 1-12.
Evans, M., Slocombe, R., and Schwartz, L., “Pulmonary silicosis in captive ring-necked pheasants: definitive diagnosis by electron probe X-ray microanalysis.” Veterinary Pathology, v. 25, no. 3, 1988, p. 239-241.
Garlipp, F., Hessel, E., van den Hurk, M., Timmerman, M., and Van den Weghe, H., “The Influence of a Particle Separation Technology on the Generation of Airborne Particles from Different Roughages and Bedding Materials Used for Horses.” Journal of Equine Veterinary Science, v. 30, no. 10, 2010, p. 545-559.
Kleven, S. and Glisson, J., “Multicausal respiratory disease.” Diseases of Poultry, Calnek, B., ed., Ames: Iowa State University Press, 1997, p. 1009.
Kristensen, H. and Wathes, C., “Ammonia and poultry welfare: a review.” World’s Poultry Science Journal, v. 56, no. 3, 2000, p. 235-245.
Line, J., “Influence of Relative Humidity on Transmission of Campylobacter jejuni in Broiler Chickens.” Poultry Science, v. 85, no. 7, 2006, p. 1145-1150.
Lacey, R., Mukhtar, S., Carey, J., and Ullman, J. “A review of literature concerning odors, ammonia, and dust from broiler production facilities: 1. Odor concentrations and emissions.” The Journal of Applied Poultry Research, v. 13, 2004, p. 500-508.
Lara, A., “Silicosis.” Merck Manual Professional Version, March 2018.
Miles, D., Rowe, D., and Cathcart, T., “Litter ammonia generation: Moisture content and organic versus inorganic bedding materials.” Poultry Science, v. 90, no. 6, 2011, p. 1162-1169.
Nagaraja, K., Emery, D., Jordan, K., Sivanandan, V., Newman, J., and Pomeroy, B., “Scanning electron microscopic studies of adverse effects of ammonia on tracheal tissues of turkeys.” American Journal of Veterinary Research, v. 44, no. 8, 1983, p. 1530–1536.
Olenchock, S., May, J., Pratt, D., Piacitelli, L, and Parker, J., “Presence of endotoxins in different agricultural environments.” American Journal of Industrial Medicine, v. 18, no. 3, 1990, p. 279-284.
Pelkonen, K. and Hänninen, O., “Cytotoxicity and biotransformation inducing activity of rodent beddings: A global survey using the Hepa-1 assay.” Toxicology, v. 122, no. 1-2, 1997, p. 73-80.
Plasticine House. “15 Smart Ideas for Better Shed Ventilation.”
Potgieter, F., Törrönen, R., and Wilke, P., “The in vitro enzyme-inducing and cytotoxic properties of South African laboratory animal contact bedding and nesting materials.” Laboratory Animals, v. 29, no. 2, 1995, p. 163-171.
Reece, F., Lott, B., and Deaton, J., “Low concentrations of ammonia during brooding decrease broiler weight.” Poultry Science, v. 60, no. 5, 1981, p. 937-940.
Ritz, C., Fairchild, B., and Lacy, M., “Litter quality and broiler performance.” Cooperative Extension Service, The University of Georgia College of Agricultural and Environmental Sciences, 2005, Bulletin 1267, p. 1-5.
Roperto, F., Borzacchiello, G., Ungaro, R., and Galati, P., “Silicate pneumoconiosis in hens.” Journal of Comparative Pathology, v. 122, no. 4, 2000, p. 249-254.
Shepherd, E., Fairchild, B., and Ritz, C., “Alternative bedding materials and litter depth impact litter moisture and footpad dermatitis.” The Journal of Applied Poultry Research, V. 26, no. 4, 2017, P. 518–528.
Siegers, E., Anthonisse, M., van Eerdenburg, F., van den Broek, J., Wouters, I., and Westermann, C., “Effect of ionization, bedding, and feeding on air quality in a horse stable.” Journal of Veterinary Internal Medicine, v. 32, no. 3, 2018, p. 1234-1240.
Soliman, E., Sallam, N., and Abouelhassan, E., “Effectiveness of poultry litter amendments on bacterial survival and Eimeria oocyst sporulation.” Veterinary World, v. 11, no. 8, 2018, p. 1064-1073.
Tasistro, A., Ritz, C., and Kissel, D., “Ammonia emissions from broiler litter: response to bedding materials and acidifiers.” British Poultry Science, v. 48, no. 4, 2007, p. 399-405.
Törrönen, R., Pelkonen, K., and Kärenlampi, S., “Enzyme-inducing and cytotoxic effects of wood-based materials used as bedding for laboratory animals. Comparison by a cell culture study.” Life Sciences, v. 45, n. 6, 1989, p. 559-565.
van der Hoeven-Hangoor, E., Rademaker, C., Paton, N., Verstegen, M., and Hendriks, W., “Evaluation of free water and water activity measurements as functional alternatives to total moisture content in broiler excreta and litter.” Poultry Science, v. 93, no. 7, 2014, p. 1782-1792.
Ward, P., Wohlt, J., Zajac, P., and Cooper, K., “Chemical and physical properties of processed newspaper compared to wheat straw and wood shavings as animal bedding.” Journal of Dairy Science, v. 83, no. 2, 2000, p. 359-367.
Wichert, B., Nater, S., Wittenbrink, M., Wolf, P., Meyer, K., and Wanner, M., “Judgement of hygienic quality of roughage in horse stables in Switzerland.” Journal of Animal Physiology and Animal Nutrition, 2008, v. 92, no. 4, p. 432-437.
Zacs Garden. “The 3 Most Popular Shed Skylight Options—Reviewed.”